Since I was a high school kid, I have been mildly obsessed with finding the perfect indicator.
Back then I remember we hollowed out balsa wood struts from left over bits of our model airplanes. They were small sections of square bar, and we used a needle to make a small hole through them lengthways, so that we could thread them onto the leader. Then of course they had to be painted and varnished for durability. As a school-kid I was excited that this idea made it into print. The downfall of these things is that you had to position them over a join in your tippet. So you found yourself making a join in the spot where you needed an indicator. It was hardly worth trying to move the the thing along for differing water depth! So despite the idea being published, it left a lot to be desired.
I cant clearly remember what came after that. Maybe we gave up on indicators for a while.
I do remember that at some point I made up yarn pom-poms, and kept them in a little box, with strands of nylon trailing, and that we tied these onto the leader. But again we had the problem of not being able to position them for each pool or run we encountered during the day. The only thing that was right about them, is that we could make them very small. This is a pre-requisite for me. My fishing buddies sometimes laugh at my indicators, since they are sometimes too small to see. I can see how that defeats the object, but I cant bring myself to be throwing a ball of wool behind a #16 nymph.
Then came Nigel Dennis’ very clever idea: Nigel showed me how he used small sections of ear-bud stem, and wrapped the yarn around these sections, binding the two ends tightly where they came together, to form a pom-pom on one side of the little plastic ring. He then threaded these onto the leader, and secured them by using a tooth pick end to secure the position. For the first time we could release the thing and move it to where we wanted!
I played around with this a little, because the indicators were too large. What I did in the end was to revert to my pom-poms tied with tippet material, but then secure this to the same plastic ring. In other words the pom pom was tied to the ring with tippet material. This allowed us to use very small plastic rings, and suddenly we had an indicator as refined as you will see today.
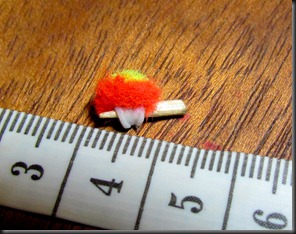
(Nigel’s secret to the above two is as follows: When you have cut the ear bud into tiny rings, hold these at the end of a fine pair of tweezers, and expose them briefly to the heat of a candle. The plastic wells up on each end, creating a tiny flange that the nylon cant slip off of.)
This method has kept me going for many years.
More recently I tried the technique of a simple overhand loop knot in the tippet, into which you insert some yarn. Peter Brigg had shown me this. This is super minimalistic, given that it dispenses with the plastic ring. The trouble is, I am just no good at getting the knot undone to move the indicator. And I like to move mine all the time.
Since then I have also experimented with an indicator secured to a dental elastic. You run a loop of tippet through the elastic, and over the little ball of yarn, and pull tight. These look perfect until the elastic stretches, and then it is all a bit messy, and difficult to move around. The other idea was to use the smallest “O” ring available, but these simply were not delicate enough for my liking.
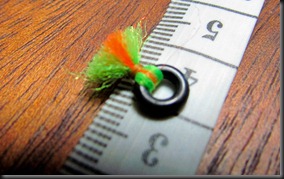 Shaun Futter uses a similar technique, but has replaced the elastic with a tiny ring of IV tube. He gave me a length of it recently. You cut a tiny piece off the end, giving you a ring, and secure your yarn to that with fly tying silk. Very handy.
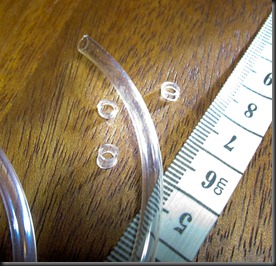
Just a few months ago, Tom Sutcliffe introduced us all to the latest trick: a strike indicator applicator tool. This comes with a supply of tubing that is somewhat finer than the IV tubing. You hook your tippet into the hook on the end of the needle, and then slide a pre-cut ring down the needle onto the tippet. Then all that remains is to place some yarn in the loop you have made, and pull tight.
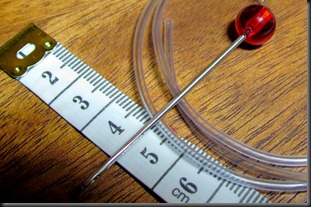
As soon as I saw this I ordered one. The trouble is, I am an impatient sod. I couldn’t wait that long for it to arrive. So I set about making my own in the meantime. Just in case, you know.
The ladies at the haberdashery looked at me a little strangely when I went in search of the special needle needed. But they were helpful enough, and got me going with some or other darning needle. All I had to do was to cut through the side of the needles eye, which was a cinch with a grinder. Then I epoxied a handle onto it, and located some modern “scooby wire”, which is in fact just a stretchy plastic tube. The local Chinese shop is likely to have some.
The end result, as it turns out, is very similar to what arrived in the post just two days later, except that it is considerably more delicate and lightweight.
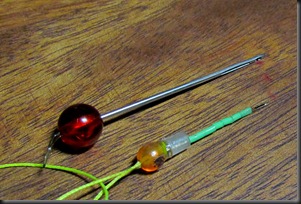
So for now, I am carrying both of these little needles in a pouch, and giving the system a bash. I will be sure to let you know how it goes, once I have done some more rigorous testing.
Please do share your indicator ideas.
3 Responses
Agreed, the most important function of an indicator, after visability is adjustability. Oh I also made myself one of those indicator tools, although don’t use nymphs much down here at the moment,
Great Tim. Tell me, what tubing have you used on your home made applicator?
Was some silicone tubing used in hearing aids.. from a friend who is in that line of business.