We have all had fish eat our indicator when nymphing. There was a time when I sighed, but ignored it. Nowadays its a trigger: “They are taking dries!” I will say, often to myself (but yes, out loud), and always with delight. And I will prepare to change to a dry.
But being an economist, I get that opportunity-cost concern that I may stop catching fish altogether, or I might miss out on a bunch of Trout.
Easy solution: the dry dropper…..meaning of course a floating dropper fly, under which you hang your nymph in the point position. Problem solved!
Not really.
Most of our dry flies (mine anyway) are designed to be dry flies: dainty, light, dance on their toes type of things. Okay, perhaps not my hoppers, but hey does it have to be a hopper dropper?
So for fishing a sometimes heavy nymph off a dry fly, I need a special one.
It needs the following features:
- Enhanced floatability
- Delicacy
- I need to be able to see it
- I still want it barbless, but I want to tie a nymph to the bend, and I don’t want to risk losing it.
- I want o fish it ‘truck & trailer’/New Zealand style, because the dry fly tracks better than it does on a revolving loop or a right angle tag.
- No foam this time please.
So here is an example of some flies I have been tying specifically for this purpose lately.
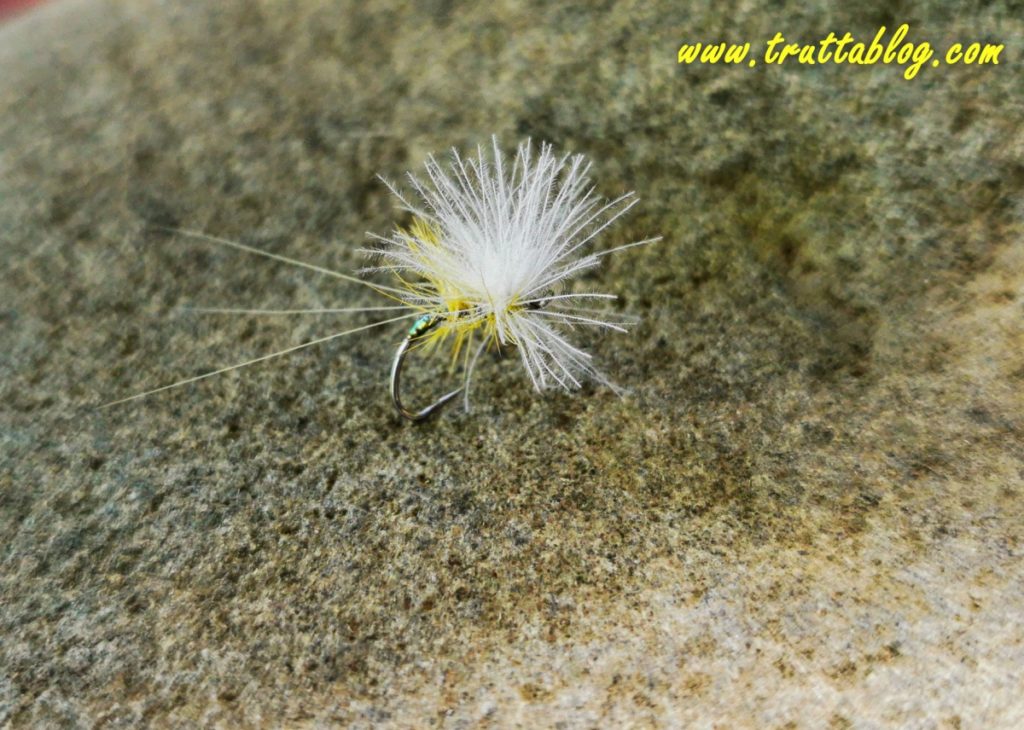

These particular ones are tied on a klinkhammer hook, but note that I only used the forward part of the shank, leaving the downward curved part merely as an attachment point for the nymph. So I have a long microfibetts tail (its sturdy…won’t break off while I am tying on the fly like hackle fibre might do, and its long, because that helps float the fly).
The fly itself is a size that is roughly half what the hook size denotes. So I used a lightwire oversized hook …say a # 12, and tied a #16 or so dressing on just the front half.
I included a pearl butt (Thanks Paul Proctor!), and I tied it on a micro barb hook. (see below for barbless)

I tied several others on barbless hooks, and in those cases I included a nylon loop tied to face downwards and secure the point fly tag when tied ‘truck-and-trailer’ style. This means that I still tie the nylon onto the hook, but it also passes through the nylon loop. That way it is using the hook for strength of connection, and the nylon serves only to prevent it slipping off the barbless hook. That way (and if tied long enough to reach the natural hang point ….important!) the nylon needs little strength and can be low diameter.
Interestingly, I have used Kevlar thread for this, but despite its tensile strength, I found some of the loops were cut through by a 7X tippet. Interesting, because military helmets made of Kevlar stop bullets. The Kevlar loop also gets fluffy, and it can become hard to find the hole in the centre of the loop.
Apart from the long tail, I tied the fly with a palmered hackle to trap lots of air in its bushy body, and I cut off the underside, so that it would float level with those long tails, because they will only do their work if they are lying flat on the surface. (microfibetts do this well, especially with some grease on them)
Then for a thorax I used a paraloop with plenty of CDC. The ones pictured above are white, but I did some of these in several colours. That is a little trick I learned from Tom Sutcliffe: when you are struggling to see the fly, before you go bigger, try different colours. You will be amazed how, in different light conditions, different colours pop!
I have been doing this with my strike indicators for ten years now, and hey, this is a strike indicator right!
Some guidelines:
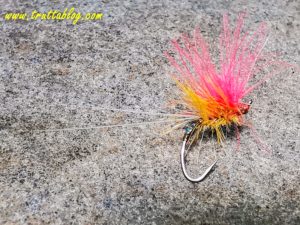
A generic go to: white
On cloudy days : Lumo green
The bright sun behind you (mornings on our eastward flowing KZN streams) : Chartreuse, but sometimes orange is better
Silvery surface (sun ahead of you): Deep red, or black
And another tip: bi-colour. So if conditions are varying between any two of the above, use half-half.
A few words on the nymph I hang below this:
It is typically small: #18 to #22, and has a maximum bead size of 2 mm. It is tied on fine nylon to help is sink (7 X or maximum 6 X). The nylon is tied to the natural hang point of the floating dropper, as illustrated above, so that from the get-go, all the point fly tag is being ushered underwater. I will also normally present this with a tuck cast, unless the nymph is being used as something closer to an emerger (that is another topic altogether! * )
The nymph is dense and sleek…like a perdigon. In other words it has no air-trapping fluff. And I tie it on a length of nylon to suit how deep I want it to go, which in turn is normally dictated by the depth of the river. What this means in practice is that as I work up the river, I often have two identical small nymphs, tied to different lengths of nylon. One is always tied onto the rig I am using, and the other is in reserve. So if I am fishing a shallow run, for example, I will have the short one on.
When I get to a pool, I clip it off, store it on my patch, or better warp it around a piece of pool noodle, and tie on the longer one.
So here’s another example from my batch. This is a GRHE emerger of sorts, as inspired by Leeson and Schollmeyer’s “Tying Emergers” book.
You can see that nylon loop there… and that big bulbous white head is quite easy to see.
(apologies for the image quality: this fly is tiny and my camera has given in…this was the best my phone could do!)

* Emergers: that whole other topic .
Here’s something I have been doing more and more of. You get to a pool, and one or two fish are rising. No more.
Experience tells you that they might do this for ten minutes, and then stop. Good regular hatches of fly with Trout keyed into eating them, and you with a hatch chart in your top pocket: that is a dream. We just don’t get that here in my part of South Africa. So you have only a few throws allotted to you, and you need to nail the fly pattern quickly. The first rise, you decide is a surface taker. The second is taking beneath the surface. You think. Then you start to doubt yourself. You could wait for another rise to make a closer inspection, but you have a nagging feeling that there are only five rises left, and then it will be over.
You can’t see what they are taking. That is bog standard for me…they are always so damned small. But you figure if you could just nail the all important dry fly vs emerger decision.
Your solution: one of these more delicate dropper flies, with an emerger behind it. It can by just a few inches behind it if you like….I mean if you are casting at a rise you don’t want a nymph hinging around wildly three or four foot behind the dry….you want to place both flies accurately here.
This has worked really well for me in recent seasons. So much so, that I have a delicate dry, plus an emerger, wrapped around my segment of pool noodle in my vest pocket whenever I am on a river.
Of course, come autumn, I will just lash on a great big hopper (foam, deer hair and all) and be done with it.
But this is more subtle, delicate, foxy, and somehow pleasing to fish.

One Response
Have to try and remember all this, Andrew!